-
1. Иш бошланиши
- 1.1 Талқинларни бошқариш ҳақида
- 1.2 Git нинг қисқача тарихи
- 1.3 Git асоси
- 1.4 Командалар сатри
- 1.5 Git ни ўрнатиш
- 1.6 Git да биринчи созлашлар
- 1.7 Қандай ёрдам олиш мумкин?
- 1.8 Хулосалар
-
2. Git асослари
-
3. Git да тармоқланиш
-
4. Git серверда
- 4.1 The Protocols
- 4.2 Getting Git on a Server
- 4.3 Sizning SSH ochiq (public) kalitingizni generatsiyalash
- 4.4 Setting Up the Server
- 4.5 Git Daemon
- 4.6 Smart HTTP
- 4.7 GitWeb
- 4.8 GitLab
- 4.9 Third Party Hosted Options
- 4.10 Хулосалар
-
5. Distributed Git
- 5.1 Distributed Workflows
- 5.2 Contributing to a Project
- 5.3 Maintaining a Project
- 5.4 Summary
-
6. GitHub
-
7. Git Tools
- 7.1 Revision Selection
- 7.2 Interactive Staging
- 7.3 Stashing and Cleaning
- 7.4 Signing Your Work
- 7.5 Searching
- 7.6 Rewriting History
- 7.7 Reset Demystified
- 7.8 Advanced Merging
- 7.9 Rerere
- 7.10 Debugging with Git
- 7.11 Qism modullar (Submodule)
- 7.12 Bundling
- 7.13 Replace
- 7.14 Credential Storage
- 7.15 Summary
-
8. Customizing Git
- 8.1 Git Configuration
- 8.2 Git Attributes
- 8.3 Git Hooks
- 8.4 An Example Git-Enforced Policy
- 8.5 Summary
-
9. Git and Other Systems
- 9.1 Git as a Client
- 9.2 Migrating to Git
- 9.3 Summary
-
10. Git Internals
- 10.1 Plumbing and Porcelain
- 10.2 Git Objects
- 10.3 Git References
- 10.4 Packfiles
- 10.5 The Refspec
- 10.6 Transfer Protocols
- 10.7 Maintenance and Data Recovery
- 10.8 Environment Variables
- 10.9 Summary
-
A1. Appendix A: Git in Other Environments
- A1.1 Graphical Interfaces
- A1.2 Git in Visual Studio
- A1.3 Git in Eclipse
- A1.4 Git in Bash
- A1.5 Git in Zsh
- A1.6 Git in Powershell
- A1.7 Summary
-
A2. Appendix B: Embedding Git in your Applications
- A2.1 Command-line Git
- A2.2 Libgit2
- A2.3 JGit
-
A3. Appendix C: Git Commands
- A3.1 Setup and Config
- A3.2 Getting and Creating Projects
- A3.3 Basic Snapshotting
- A3.4 Branching and Merging
- A3.5 Sharing and Updating Projects
- A3.6 Inspection and Comparison
- A3.7 Debugging
- A3.8 Patching
- A3.9 Email
- A3.10 External Systems
- A3.11 Administration
- A3.12 Plumbing Commands
4.8 Git серверда - GitLab
GitLab
GitWeb is pretty simplistic though. If you’re looking for a more modern, fully featured Git server, there are some several open source solutions out there that you can install instead. As GitLab is one of the more popular ones, we’ll cover installing and using it as an example. This is a bit more complex than the GitWeb option and likely requires more maintenance, but it is a much more fully featured option.
Installation
GitLab is a database-backed web application, so its installation is a bit more involved than some other git servers. Fortunately, this process is very well-documented and supported.
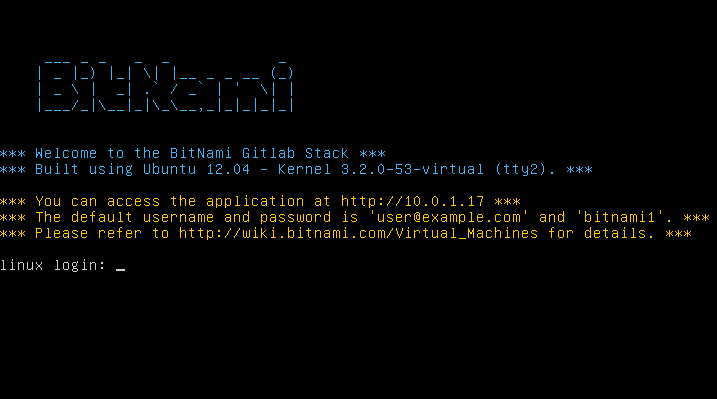
There are a few methods you can pursue to install GitLab. To get something up and running quickly, you can download a virtual machine image or a one-click installer from https://bitnami.com/stack/gitlab, and tweak the configuration to match your particular environment. One nice touch Bitnami has included is the login screen (accessed by typing alt-→); it tells you the IP address and default username and password for the installed GitLab.
For anything else, follow the guidance in the GitLab Community Edition readme, which can be found at https://gitlab.com/gitlab-org/gitlab-ce/tree/master. There you’ll find assistance for installing GitLab using Chef recipes, a virtual machine on Digital Ocean, and RPM and DEB packages (which, as of this writing, are in beta). There’s also “unofficial” guidance on getting GitLab running with non-standard operating systems and databases, a fully-manual installation script, and many other topics.
Administration
GitLab’s administration interface is accessed over the web.
Simply point your browser to the hostname or IP address where GitLab is installed, and log in as an admin user.
The default username is admin@local.host, and the default password is 5iveL!fe (which you will be prompted to change as soon as you enter it).
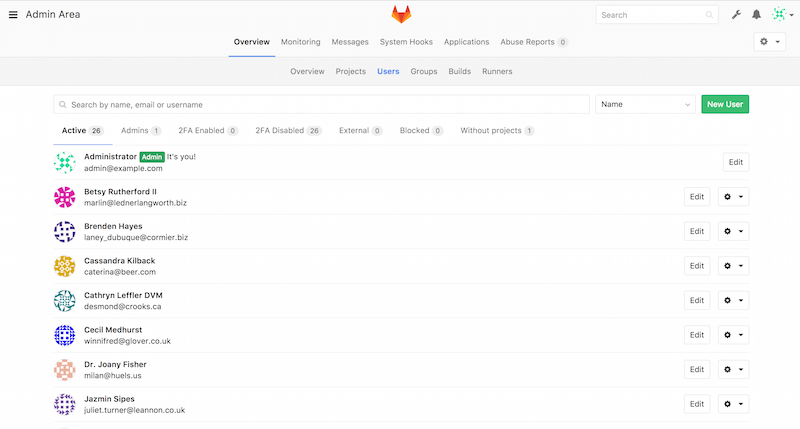
Once logged in, click the “Admin area” icon in the menu at the top right.

Users
Users in GitLab are accounts that correspond to people.
User accounts don’t have a lot of complexity; mainly it’s a collection of personal information attached to login data.
Each user account comes with a namespace, which is a logical grouping of projects that belong to that user.
If the user jane had a project named project, that project’s url would be http://server/jane/project.
Removing a user can be done in two ways. “Blocking” a user prevents them from logging into the GitLab instance, but all of the data under that user’s namespace will be preserved, and commits signed with that user’s email address will still link back to their profile.
“Destroying” a user, on the other hand, completely removes them from the database and filesystem. All projects and data in their namespace is removed, and any groups they own will also be removed. This is obviously a much more permanent and destructive action, and its uses are rare.
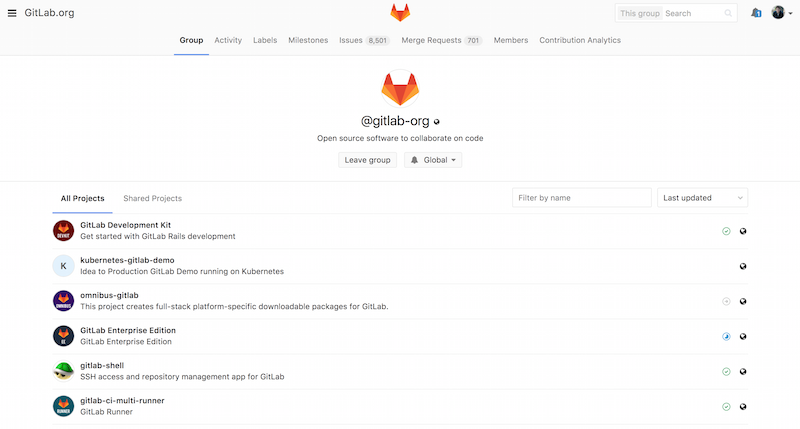
Groups
A GitLab group is an assemblage of projects, along with data about how users can access those projects.
Each group has a project namespace (the same way that users do), so if the group training has a project materials, its url would be http://server/training/materials.
Each group is associated with a number of users, each of which has a level of permissions for the group’s projects and the group itself. These range from “Guest” (issues and chat only) to “Owner” (full control of the group, its members, and its projects). The types of permissions are too numerous to list here, but GitLab has a helpful link on the administration screen.
Projects
A GitLab project roughly corresponds to a single git repository. Every project belongs to a single namespace, either a user or a group. If the project belongs to a user, the owner of the project has direct control over who has access to the project; if the project belongs to a group, the group’s user-level permissions will also take effect.
Every project also has a visibility level, which controls who has read access to that project’s pages and repository. If a project is Private, the project’s owner must explicitly grant access to specific users. An Internal project is visible to any logged-in user, and a Public project is visible to anyone. Note that this controls both git “fetch” access as well as access to the web UI for that project.
Hooks
GitLab includes support for hooks, both at a project or system level. For either of these, the GitLab server will perform an HTTP POST with some descriptive JSON whenever relevant events occur. This is a great way to connect your git repositories and GitLab instance to the rest of your development automation, such as CI servers, chat rooms, or deployment tools.
Basic Usage
The first thing you’ll want to do with GitLab is create a new project. This is accomplished by clicking the “+” icon on the toolbar. You’ll be asked for the project’s name, which namespace it should belong to, and what its visibility level should be. Most of what you specify here isn’t permanent, and can be re-adjusted later through the settings interface. Click “Create Project”, and you’re done.
Once the project exists, you’ll probably want to connect it with a local Git repository.
Each project is accessible over HTTPS or SSH, either of which can be used to configure a Git remote.
The URLs are visible at the top of the project’s home page.
For an existing local repository, this command will create a remote named gitlab to the hosted location:
$ git remote add gitlab https://server/namespace/project.gitIf you don’t have a local copy of the repository, you can simply do this:
$ git clone https://server/namespace/project.gitThe web UI provides access to several useful views of the repository itself. Each project’s home page shows recent activity, and links along the top will lead you to views of the project’s files and commit log.
Working Together
The simplest way of working together on a GitLab project is by giving another user direct push access to the git repository. You can add a user to a project by going to the “Members” section of that project’s settings, and associating the new user with an access level (the different access levels are discussed a bit in Groups). By giving a user an access level of “Developer” or above, that user can push commits and branches directly to the repository with impunity.
Another, more decoupled way of collaboration is by using merge requests.
This feature enables any user that can see a project to contribute to it in a controlled way.
Users with direct access can simply create a branch, push commits to it, and open a merge request from their branch back into master or any other branch.
Users who don’t have push permissions for a repository can “fork” it (create their own copy), push commits to that copy, and open a merge request from their fork back to the main project.
This model allows the owner to be in full control of what goes into the repository and when, while allowing contributions from untrusted users.
Merge requests and issues are the main units of long-lived discussion in GitLab. Each merge request allows a line-by-line discussion of the proposed change (which supports a lightweight kind of code review), as well as a general overall discussion thread. Both can be assigned to users, or organized into milestones.
This section is focused mainly on the Git-related features of GitLab, but as a mature project, it provides many other features to help your team work together, such as project wikis and system maintenance tools. One benefit to GitLab is that, once the server is set up and running, you’ll rarely need to tweak a configuration file or access the server via SSH; most administration and general usage can be accomplished through the in-browser interface.